Over the last few posts I’ve outlined what I do when I first get access to a Linux server, changing settings so I’m comfortable (see part 1) and installing packages to become more productive (part 2).
Oh My Posh
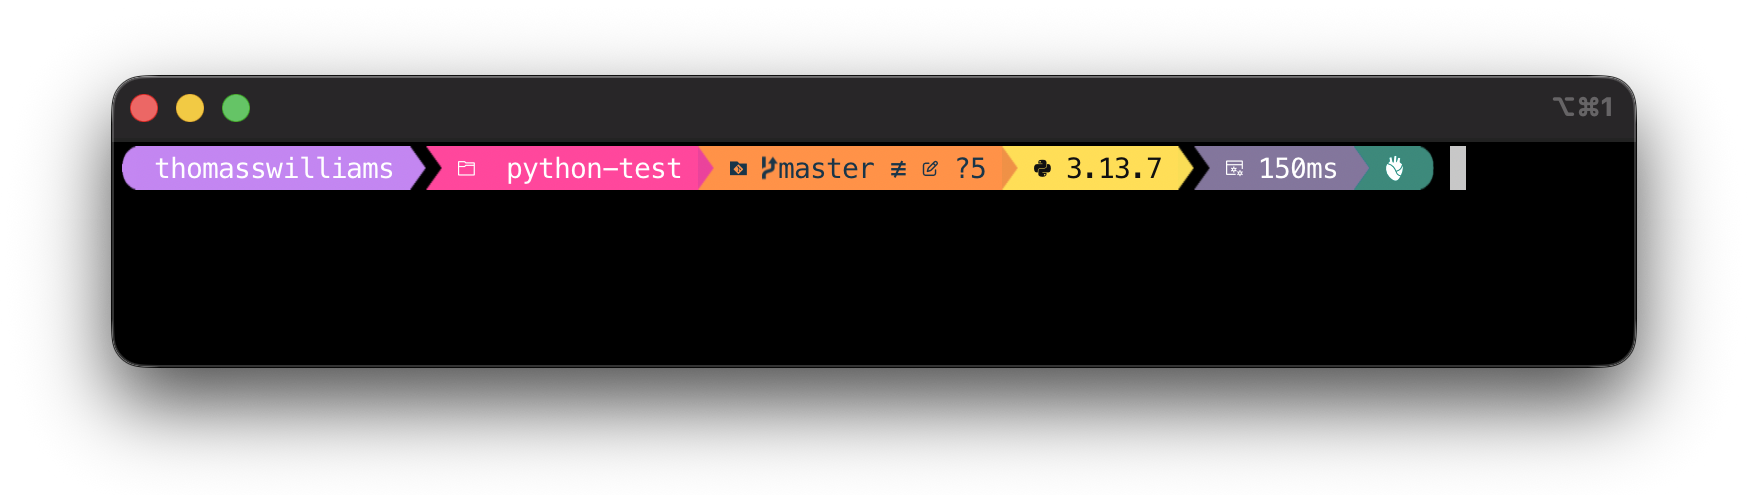
For an even better prompt, I’m a fan of “Oh My Posh” https://ohmyposh.dev/. Once installed, my prompt looks like below, shown in a Python Git repository directory - with the Oh My Posh prompt displaying my username, the directory name, the Git branch and files needing commit, the current Python version (because I’m in a Python project directory with uv), and lastly the time it took to complete the previous command and whether the command was successful:
Other sections of the command prompt are hidden and shown as needed, depending on whether you’re in a Python, Node or other directory. There’s probably further surprises in the prompt I haven’t yet come across.
Here’s how I set it up:
- save the install shell script from https://ohmyposh.dev/install.sh and run it in one command:
curl -s https://ohmyposh.dev/install.sh | bash -s - install a nerd font with glyphs (for example, Meslo from https://www.nerdfonts.com/font-downloads) on the computer running your terminal software
- pick a theme: I downloaded “jandedobbeleer.omp.json” from https://raw.githubusercontent.com/JanDeDobbeleer/oh-my-posh/main/themes/jandedobbeleer.omp.json and saved it in my home folder (or you can copy-paste the contents from the web into a file with that name)
- load Oh My Posh by adding to the end of
.bashrc(on Mac) or.profile(Linux):
# run oh-my-posh and load local config file "jandedobbeleer.omp.json"
eval "$(oh-my-posh init bash --config ~/jandedobbeleer.omp.json)"
There are complete instructions for Windows, Mac and Linux - including all the myriad shells - at https://ohmyposh.dev/docs/installation/customize.
Now when I next log in, my prompt is extra-functional and futuristic!
(Hat tip to my original inspiration, in 2021, of Scott Hanselman’s post at https://www.hanselman.com/blog/my-ultimate-powershell-prompt-with-oh-my-posh-and-the-windows-terminal. Plus, there’s other alternatives too - such as Starship https://starship.rs/ or Oh My Zsh https://ohmyz.sh/.)
Closing thoughts
That’s it for now, for customising my Linux command line. A little effort can go a long way! Hopefully you found something of use; good luck with your own customisations, and let me know via a comment or on Bluesky of anything you do to Linux servers you manage.
The last two “Linux personalisations” things didn’t really fit with my other posts, so I’m tacking them onto the end:
Patching
Patching on an Ubuntu Linux server happens in 2 stages:
- update sources:
sudo apt update - upgrade packages:
sudo apt upgrade -y
To upgrade between minor versions (like I needed to do recently, upgrading from Ubuntu 25.04 to 25.10), run sudo do-release-upgrade.
Terminal screensaver
OK, this is not a “must-have”, but lately I came across terminal screensavers. They’re a wonder of clever coding and animation, implemented as shell scripts. I particularly liked the “Matrix” screensaver at https://github.com/attogram/bash-screensavers/blob/main/gallery/matrix/matrix.sh. CTRL+C quits, and COMMAND+K clears the screen (at least it does on iTerm on a Mac, the key combination might vary depending on which terminal software you use).