In my last post on improving inputs in R Markdown/Shiny, I covered four improvements to quality of life in interactive reports and dashboards. In this blog post I have three more, all approaches I’ve used to add professionalism to self-service R Markdown files.
In yet another plug for R Markdown: most of these techniques can be used in a single *.Rmd file, or can be included in many by putting them in a common CSS or javascript file and linking to it.
Newer Bootstrap
For a start, let’s use bslib defined in the YAML front-matter, which bumps the Bootstrap version from 3 (circa 2015) to 5 (circa 2021):
output:
  html_document:
    theme:
      # bslib Bootstrap version 5 theming
      # required by bslib components like "tooltip"
      version: 5
      bslib: true
With bslib comes a simpler dark mode switch too, with a nice animated icon. Now, a working dark mode switcher is as simple as:
# R
bslib::input_dark_mode(id = "dark_mode")
CSS to visually improve inputs
I’ve noticed with some themes, Shiny inputs don’t visually differentiate from a plain text box. The CSS below displays background icons from SVGs for date inputs and dropdowns, but could be extended for other inputs:
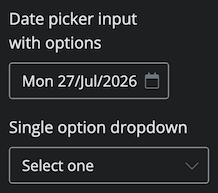
/* CSS */
/* dropdown/select caret */
select.shiny-input-select {
  padding-right: 2rem;
  /* Bootstrap down caret; color ("fill") works well with dark or light theme */
  background-image:
    url("data:image/svg+xml,%3Csvg xmlns='http://www.w3.org/2000/svg' width='16' height='16' fill='%236c757d' viewBox='0 0 16 16'%3E%3Cpath fill-rule='evenodd' d='M1.646 5.646a.5.5 0 0 1 .708 0L8 11.293l5.646-5.647a.5.5 0 0 1 .708.708l-6 6a.5.5 0 0 1-.708 0l-6-6a.5.5 0 0 1 0-.708z'/%3E%3C/svg%3E");
  background-repeat: no-repeat;
  background-position: right 0.5rem center;
  background-size: 1rem;
}

/* date parameter (remember to use your own identifer) - style with calendar icon at right of input */
#date_input > .form-control {
  padding-right: 2rem;
  /* calendar icon from SVG, translated from Bootstrap "calendar3" icon; color ("fill") works well with dark or light theme */
  background-image:
    url("data:image/svg+xml,%3Csvg xmlns='http://www.w3.org/2000/svg' width='16' height='16' fill='%236c757d' viewBox='0 0 16 16'%3E%3Cpath d='M11 0a1 1 0 0 1 1 1v1h1.5A1.5 1.5 0 0 1 15 3.5v11A1.5 1.5 0 0 1 13.5 16h-11A1.5 1.5 0 0 1 1 14.5v-11A1.5 1.5 0 0 1 2.5 2H4V1a1 1 0 0 1 2 0v1h4V1a1 1 0 0 1 1-1zM2 6v8.5a.5.5 0 0 0 .5.5h11a.5.5 0 0 0 .5-.5V6H2z'/%3E%3C/svg%3E");
  background-repeat: no-repeat;
  background-position: right 0.5rem center;
  background-size: 1rem;
}
See the source code at my repo https://github.com/thomasswilliams/r-markdown-snippets/blob/main/improve-inputs-2.Rmd which can be run using R and RStudio.
On a side note, the date input has a lot of options including disabling future dates, setting earliest selectable date, formatting the date, setting the start day of the week - it might be worth taking the time to read the docs at https://shiny.posit.co/r/reference/shiny/latest/dateinput.html.
CSS styling could be taken further by using a background icon that has meaning for users - either at right (like demonstrated above) or the left side - and helps visually differentiate the purpose of the input. For example, a flag icon for countries, a map icon if selecting localities, phone icon for phone numbers, currency indicator for money etc.
Taking it to the next stage: https://dreamrs.github.io/shinyWidgets/ has a lot more input types.
Hiding complex parameters behind links

This technique is about conserving space and hiding complexity. If a report has a few well-used combinations of parameters, a link could be used to quickly set them. Below is the code for links which call javascript to set the month and “type”, though every report is different. This technique works best with larger numbers of parameters, or even seldom-used parameters you may not want to make visible if they add clutter.
First, the R snippet which generates the links and respective javascript code:
# R
# get current month so we can set previous month
current_month_date <- Sys.Date()
# use lubridate to get last and next month names which we can pass to javascript
last_month_name <- format(current_month_date %m-% months(1), "%B")
next_month_name <- format(current_month_date %m+% months(1), "%B")
# need "results = 'asis'" to output HTML directly, otherwise will be escaped
# these are the quick links, in this case calling custom functions to set one or more parameters
# call custom javascript functions to set the month and type inputs
# need to escape single quotes with leading backslash
cat(sprintf(
'<br><a href="#" onclick="setMonthInput(\'%s\'); setTypeInput(\'Sales\'); return false;">• Last month\'s sales</a><br><a href="#" onclick="setMonthInput(\'%s\'); setTypeInput(\'Projected\'); return false;">• Next month\'s projected</a>',
last_month_name, next_month_name
))
Then the javascript functions themselves, called by the links above like setMonthInput('June'); setTypeInput('Sales');:
// javascript
// custom javascript functions to set Shiny inputs
// set month input to passed full month name
function setMonthInput(monthName) {
  // get the Selectize instance for the month input
  // can substitute your own Shiny input name here
  var selectizeInstance = $('#month_input')[0].selectize;
  // if we got the Selectize instance, use its API to set the value
  if (selectizeInstance) {
    // use Selectize API to set value rather than Shiny
    // don't suppress change event (second argument), so Shiny will react to change
    selectizeInstance.setValue(monthName, false);
  } else {
    // fallback if Selectize hasn't initialised yet and just set raw HTML select value
    // using jQuery
    $('#month_input').val(monthName).trigger('change');
  }
}
// set "type" dropdown to passed value
function setTypeInput(typeName) {
  // set the value, trigger change event
  $('#type_input').val(typeName).trigger('change');
}