Caching in R Markdown is a valuable step to get your app, report or visualisation more production-ready. There are one or two potential issues to watch out for, especially when deploying a cache-enabled R Markdown file to a Shiny server - in this post I’ll go over some of these “gotchas”, and how you could address each one.
Caching in R Markdown - two methods
As background: caching in R Markdown is built-in and simple to implement, for instance below where I specify the cache directory for a whole code block, caching the results for 1 day (well, until the date changes):
```{r, echo = FALSE, results = 'asis', cache = TRUE, cache.extra = Sys.Date(), cache.path = "cache/"}
# load results from long-running function (e.g. database, API) into variable
test_var <- results_from_long_running_function()
# more info on caching at https://bookdown.org/yihui/rmarkdown-cookbook/cache.html
```
Why specify the cache directory? Otherwise, R Markdown creates cache directories and files using the name of the R Markdown file, and chunk name. This is fine, but can make deploying to a Shiny server (see gotcha 3, below) a little harder. YMMV.
There are also dedicated R packages for caching like the cleverly-named mustashe from https://github.com/jhrcook/mustashe which I previously demo’d in “Recreating my basic Antarctic Leaflet map in R (tiles, shapes, graticules, labels)”. These can be useful when you want more control over caching:
# R
# mustashe caching
# https://jhrcook.github.io/mustashe/
library(mustashe)

# get current date for caching
current_date <- Sys.Date()

# cache for one day using mustashe
# this means subsequent runs on the same day will be faster as
# data is retrieved from cache after the first run
# assumes data does not change very often

# pass the name of the variable, and the current date
# by default will cache in directory called ".mustashe"
mustashe::stash("test_var", depends_on = "current_date", {
  # load results from long-running function (e.g. database, API) into variable
  test_var <- results_from_long_running_function()
})

# use the variable as normal - it will either be retrieved from cache, or added to cache and and set
test_var...
Usually, cache directories and files are created as needed by the caching code (you can see this for yourself by using one of the above methods for caching, then looking at the file system).
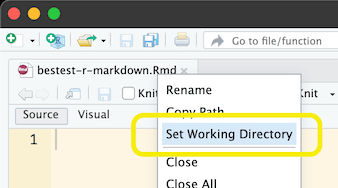
Gotcha 1: not running in the current working directory
Sometimes when I’ve had head-scratching results trying to cache, the easy fix has been to make sure I’m running in the current working directory (whether from an R or R Markdown file):

Gotcha 2: cache directories in version control
Cache directories do not need to be added to version control as they are created when needed in your code. So, cache directories should be added to the .gitignore file.
I typically use a .gitignore adapted from https://github.com/github/gitignore/blob/main/R.gitignore which already ignores directories named cache.
To ignore the mustashe cache directory add the following lines to a .gitignore file:
# mustashe cache directory
/.mustashe/
Gotcha 3: unable to create cache directory on Shiny server
OK, we’ve got R Markdown caching working on our local development machine and are happy with the results.
Next step is to deploy to a Shiny server.
Before we start, a couple of disclaimers - your setup and environment may be different than mine, so please test, test, test any code you find online (including from my blog). The process below was developed using an Ubuntu Shiny server. Lastly, I refer to "<deployment directory>" in this section for the directory R Markdown files are in - substitute the real name.
Depending on the setup, the user running the Shiny process may not be able to write to the deployment directory (e.g. /srv/shiny-server/<deployment directory>/), so, can’t create a cache directory or files.
(You can check which user runs Shiny processes by looking at /etc/shiny-server/shiny-server.conf on the Shiny server; refer to the Shiny Server Administrator’s Guide at https://docs.rstudio.com/shiny-server/.)
The trick is to manually create the cache directory on the Shiny server, and set appropriate permissions. Here’s how I did it (once again, on Ubuntu):
- you’ll need a login on the Shiny server, and (if required) the ability to run
sudo -
sshto the Shiny server, and create a directory with the exact name required under/srv/shiny-server/<deployment directory>/, for instance:sudo mkdir /srv/shiny-server/<deployment directory>/cache -
grant users write permissions on the new directory:
sudo chmod -R 774 /srv/shiny-server/<deployment directory>/cache -
make the Shiny server user the owner of the new directory (adapted from https://stackoverflow.com/a/36735835); this assumes the Shiny user is
shiny:sudo chown -R shiny:shiny /srv/shiny-server/<deployment directory>/cache
Now, caching should work on the Shiny server.
If you still receive errors when caching, copy the latest log file (on Ubuntu, by default at /var/log/shiny-server) to your user home directory, reset permissions on the log file, and view it. I’ve found the log file is commonly named with the name of the deployment directory, then the name of the Shiny user, then the UTC date and time it was created:
-
copy log file from log directory to your user home directory:
sudo cp /var/log/shiny-server/<directory name>-shiny-20230101-000000-00000.log /home/<your user home directory>/ -
reset permissions on the newly-copied file so you can view it:
sudo chown <your user name> <directory name>-shiny-20230101-000000-00000.log